How tunnel washes create swirl marks and what fixes them
Pull a clean dark-colored vehicle into bright sunlight and look across the hood at a low angle. What you see — that web of fine circular scratches radiating outward in overlapping arcs — is swirl marks. Most owners assume swirl marks come from parking lot scuffs or careless washing at home. In a significant number of cases, the actual cause is the automatic tunnel wash they drove through last Tuesday. Understanding why that happens, and what it takes to undo the damage, is worth knowing before you commit to any paint correction service.
Swirl marks are not a single scratch. They are a dense collection of micro-abrasions in the clear coat layer, shallow enough that they do not reach color but deep enough to scatter light rather than reflect it. The result is a paint surface that looks dull, cloudy, or hazy in direct sun — even on a vehicle that has otherwise been well maintained. Paint correction is the process of removing enough clear coat material to bring the surface back below the depth of those scratches, restoring a flat, mirror-like finish.
Why tunnel washes cause so much damage
The physics of a tunnel wash work against clean paint. The rotating foam brushes and hanging cloth strips that contact your car’s surface are shared between dozens or hundreds of vehicles per day. Dirt, sand particles, and grit become embedded in those media almost immediately after the wash opens in the morning. Every vehicle that passes through afterward is effectively being rubbed with a mildly abrasive pad loaded with debris.
The damage compounds because of pressure and contact angle. A foam cannon in a tunnel applies significant mechanical force, and the brushes cannot distinguish between a relatively clean roof panel and a grit-laden rocker panel they just swept across thirty seconds earlier. The result is random, multidirectional scratching — which is exactly what produces the circular swirl pattern visible under directional light. Touchless tunnel washes reduce mechanical contact but compensate with aggressive chemical cleaners that can strip wax and sealants, leaving paint chemically stressed rather than physically scratched. Neither option is benign for clear coat.
What paint correction actually removes
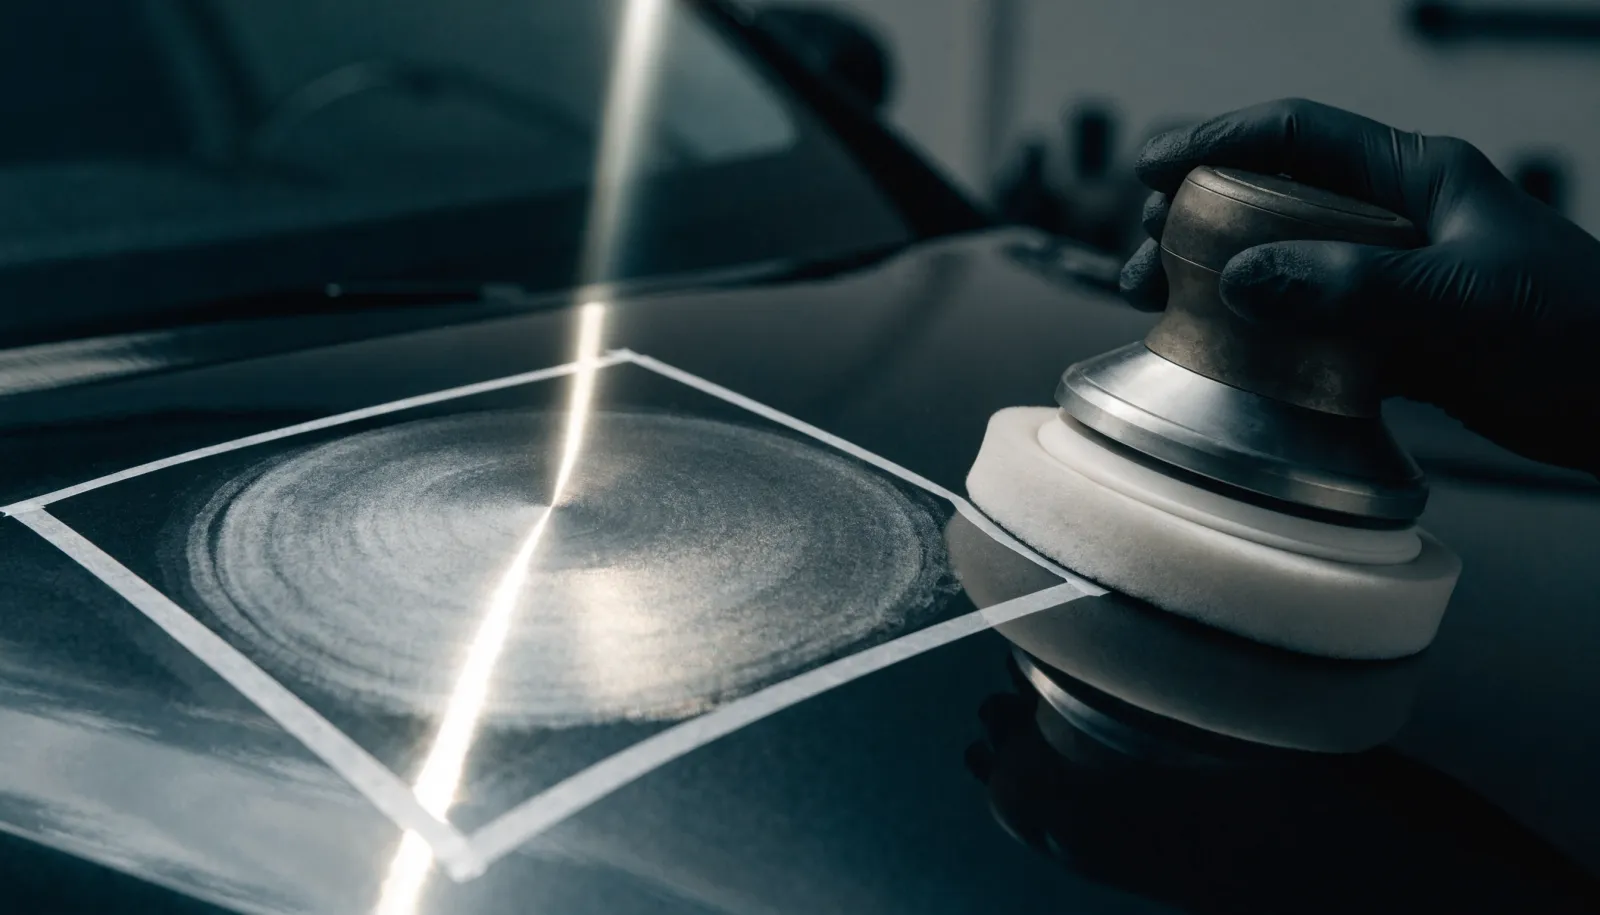
Clear coat on a modern production vehicle typically runs between 40 and 60 microns thick. Swirl marks from repeated tunnel washing generally penetrate 2 to 5 microns into that layer. Paint correction removes a controlled amount of clear coat — usually 1 to 3 microns per correction stage — using a machine polisher paired with cutting compounds or polishes matched to the hardness of the clear coat in question.
The goal is to reach a depth below the scratch floor so that the surface re-levels itself into a uniform plane. Light reflecting off that plane no longer scatters; it bounces back evenly, which is what produces the wet, deep gloss that a corrected vehicle shows compared to an uncorrected one. A one-stage correction handles moderate swirling and light scratches. A two-stage process adds an initial cut with a more aggressive compound to address deeper defects before a finishing polish refines the surface. Three-stage correction is reserved for severely neglected paint, heavy oxidation, or panels with both deep scratches and marring that requires multiple abrasive steps to resolve.
For a deeper look at how these stages differ and which level applies to your vehicle, see the paint correction service page for an overview of what each tier involves.
How dark colors show damage more severely
Swirl marks exist on every color of paint. They are simply harder to see on white, silver, and light gray vehicles, where the base color already diffuses light in a way that masks fine surface texture. On black, dark blue, navy, graphite, and deep red paint, swirl marks are immediately visible in any directional light because the contrast between the reflective clear coat and the scratched zones is high enough to register clearly.
This does not mean light-colored vehicles escape damage. It means the damage accumulates invisibly until it becomes severe enough to create a generally dull appearance rather than the characteristic swirl pattern. Owners of white trucks and silver sedans who drive through tunnel washes regularly often notice that the paint just looks flat over time without understanding that the cause is the same accumulated micro-abrasion affecting darker vehicles in a more visually obvious way.
Paint thickness also matters. Softer European clear coats — common on many German and British brands — scratch more easily and require more careful compound selection during correction. Harder Japanese and Korean clear coats resist initial scratching better but require more aggressive cutting to level once damage accumulates. A thorough paint thickness measurement before any correction work confirms how much material is available and prevents cutting through thin or previously corrected panels.
What happens if swirl marks are left in place before a ceramic coating
A ceramic coating applied over swirl-marked paint does not hide the defects. The coating bonds to the surface as it finds it, which means it locks in every scratch, swirl, and haze that exists at the time of application. Under the coating’s high gloss, those defects become easier to see, not harder, because the enhanced reflectivity draws more attention to surface imperfections. Any shop that applies a coating without addressing the underlying paint condition is delivering an inferior result regardless of the quality of the coating product itself.
The correct sequence is decontamination first — chemical and mechanical removal of embedded iron fallout, tar, and bonded surface contamination — followed by paint correction to the level the paint requires, then coating application on a fully prepared surface. Skipping correction to save cost or time is one of the most common reasons owners are disappointed with how their coating looks. If you are planning to protect corrected paint long-term, our ceramic coating service explains what properly prepared paint looks like going into that process.
What to expect during a correction appointment
The work begins with a wash and decontamination to remove surface contamination that would otherwise load the polish pad and create new scratches during the correction itself. After decontamination, paint thickness readings are taken across all panels to map the available clear coat and identify any areas with prior repairs or factory thin spots.
The installer then works under high-intensity, color-corrected lighting — the kind that reveals every surface imperfection at any angle — to assess defect depth and select the appropriate pad and compound combination. A test spot confirms that the chosen process produces the intended result before committing to a full panel. The polisher works in overlapping passes across each section, removing material uniformly. After cutting, a finishing polish refines the surface to eliminate any haze introduced by the compound stage. The final surface is inspected under the same lighting that revealed the original defects, and any remaining areas are addressed before the vehicle is considered complete.
The full appointment for a correction on an average sedan runs anywhere from six to sixteen hours depending on condition and the number of stages required. Vehicles with severe oxidation, deep scratches, or complex body panel geometry take longer. Rushing the process produces visible inconsistencies — holograms, buffer trails, and uneven gloss levels — that require additional work to resolve.
The practical case for correcting before anything else
Paint correction is not a luxury step reserved for show cars. It is the foundational work that determines the quality of everything applied afterward, and for daily-driven vehicles that have been through tunnel washes for years, the need is almost always present to some degree. A corrected, properly coated surface is also easier to maintain because the hydrophobic layer sheds dirt, pollen, and water before they can bond to the paint. The reduction in maintenance effort over the life of the coating tends to offset the initial correction cost for most owners who wash their vehicles regularly.
If you are unsure whether your paint needs a one-stage touch-up or a more involved multi-stage process, a pre-service inspection is the right starting point. Call EuroLuxe Detailing at (346) 920-4372 to schedule an evaluation before committing to any service level.
Swirl marks from tunnel washing are one of the most common and most correctable forms of paint damage seen on North Houston vehicles. The damage is real, measurable, and visible — and the process for addressing it is straightforward when done by someone who understands how clear coat behaves under a polisher and what a properly finished surface is supposed to look like.